Replacing a bike tire: complete guide for beginners
, by TJB Trading, 4 min reading time
, by TJB Trading, 4 min reading time
Zelf een fietsband vervangen? Met deze rustige stap-voor-stap handleiding weet je wat je nodig hebt, waar je op moet letten en hoe je voorkomt dat de nieuwe band meteen weer lek is.
A flat tire is one of those chores you dread… until you've done it once. After that, you mostly think: oh, was that it?
With a few simple tools and a bit of calm, you'll be cycling again in no time.
Usually, when people say "replace tire," they mean the inner tube. The outer tire often only needs to be replaced if it's bald, has cracks, or keeps "holding on" to small stones/glass everywhere.
Have these ready, it saves walking back and forth:
New inner tube (correct size)
Tire levers
Pump
(Sometimes) wrench/Allen key if you don't have a quick release
Cloth or gloves if you want to stay clean 😄
Tip: The size is on the side of your outer tire (e.g., 37-622 / 700x35c). Buy your inner tube based on that.
Front wheel: usually easy. Open the quick release or loosen the nuts, and you're done.
Rear wheel: a bit more fiddly (especially with hub gears), but still perfectly doable.
Do you have rim brakes? Open them up a bit so the wheel can come out more easily.
Let all the air out and pry one side of the outer tire loose with tire levers.
Once you have a piece over the rim, the rest often follows easily.
Pull out the inner tube. Start opposite the valve and remove the valve last.
Important (really do this): feel with your fingers inside the outer tire for anything left inside (glass, thorn, sharp stone).
If you leave it in, you'll have another flat in 5 minutes.
Check if the rim tape is still properly in place. If it's shifted or broken, spoke nipples can puncture your inner tube.
Pump it up very slightly (so it gets its shape), insert the valve through the rim hole, and carefully place the tube all around inside the outer tire.
No twists, no kinks. Just lay it in gently.
This is the "annoying" part for many people: pushing the last, tight piece back on.
Start at the valve
Work your way around
Finish opposite the valve (where the tension is highest)
And now, the life hack 👇
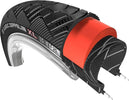
Putting the outer tire back on—especially that last part—can be quite tight. You might quickly resort to prying with tire levers… and then accidentally puncture your new inner tube. A shame.
With a Tyre Glider, you can slide the tire back over the rim edge much more controlled. Less force, less chance of damage, and your hands stay intact.
Walk around the wheel:
Is the inner tube not sticking out anywhere between the rim and the outer tire?
Is the valve straight?
Push the valve in a little bit and pull it back out—that helps the tire "seat" properly.
Pump it up slowly and check if the outer tire is evenly seated in the rim everywhere (you often see a thin line on the tire that should be equally far from the rim all around).
The correct tire pressure is indicated on the outer tire (e.g., 3.5–6 bar).
Not checking for glass/thorns → immediate new flat
Inner tube pinched when replacing → flat due to "kink"
Riding with too little pressure → more frequent flats and harder pedaling
Prying too hard with tire levers → new inner tube damaged